Multiple Windows on iPad for iOS 13: Part I
AUGUST 4, 2019 github contact
In the keynote of WWDC 2019, one announcement that got a little overshadowed by all of the other amazing announcements was the differentiation between the operating system that runs on the iPhone and the one that runs on the iPad. Starting this year, there is now an iPadOS. While there have always been iPad specific capabilities (split-screen multitasking and pencil support come to mind), now that the operating system for the phone and the tablet are no longer so closely tied, the promise is that more advanced, tablet-specific features can be created.
Toward those ends, one of the first major capabilities added to iPadOS is the ability to have the same app running in multiple windows. Today, we'll look at how to enable multi-window support in an iPad app and how that changes the requirements for our app's architecture. To do that we will start with the standard "Master-Detail App" template and modify it to allow multiple windows. Later, we'll come back and look at how we can improve the multi-window experience.
To start you'll need Xcode 11 installed and an iPad running iOS 13 (you can always just use the simulator if you don't have an iPad) both of which, at the time of this writing, are in beta and can be downloaded from developer.apple.com.
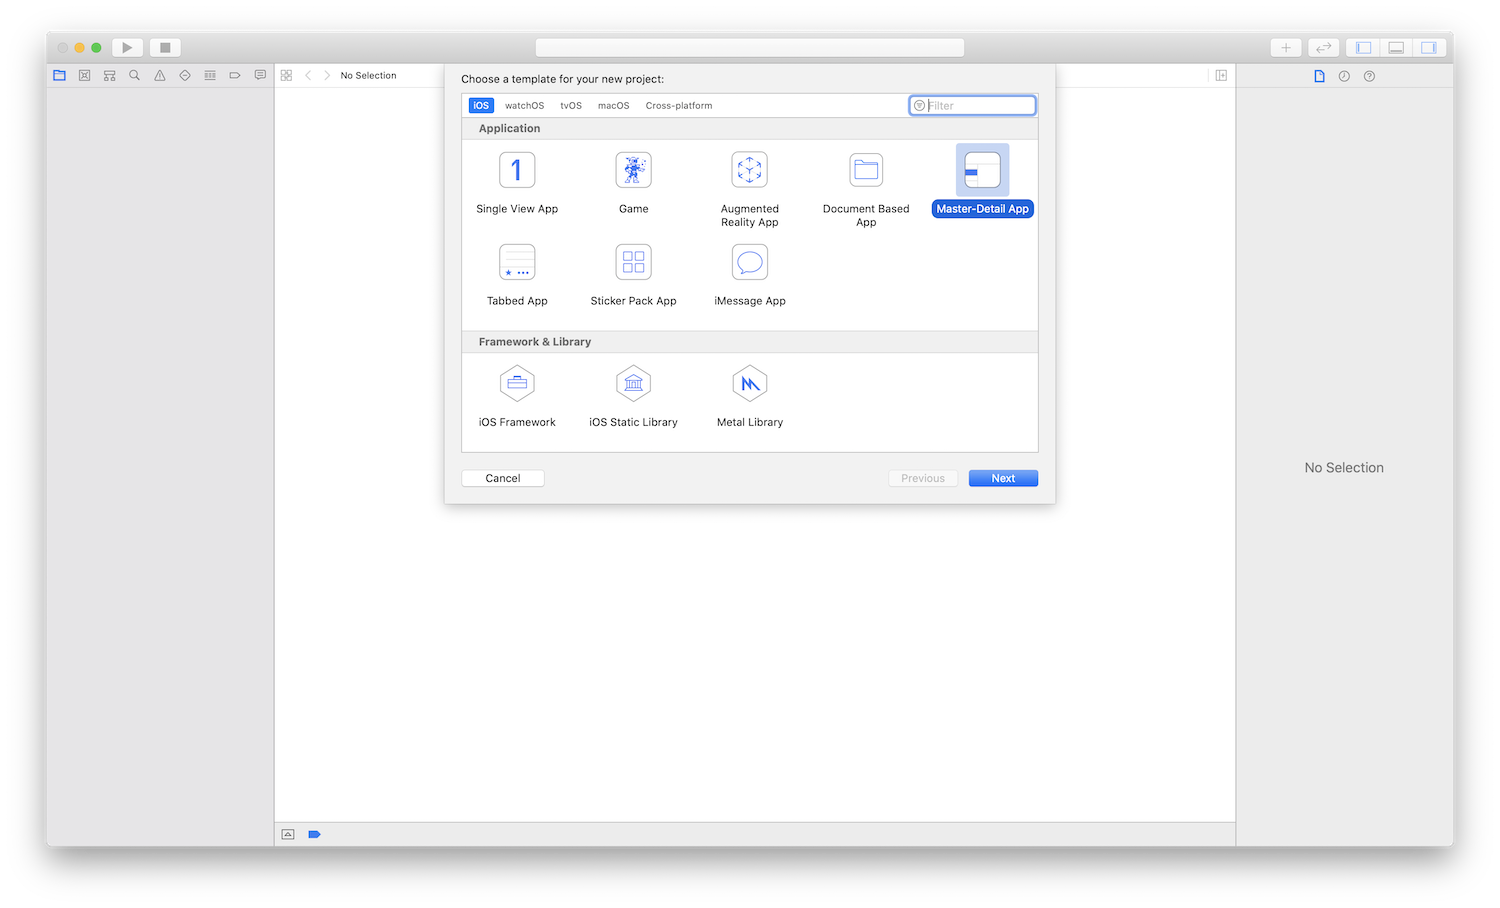
Start by opening Xcode, create a new project, select "Master-Detail App" from the template picker. Create a name for the project; I called it "Windows." I also left "Use Core Data" unchecked.
With that, you can build and run. Putting the device in landscape, you can see a table view in the master view controller and a label in the detail view controller. Tapping the + button adds timestamps to the table view. Selecting a timestamp displays the same timestamp in the detail's label. You can also delete timestamps from the list. While this app certainly won't win an Apple Design Award, it is complex enough to show some of the things to consider when building an app with multiple windows.
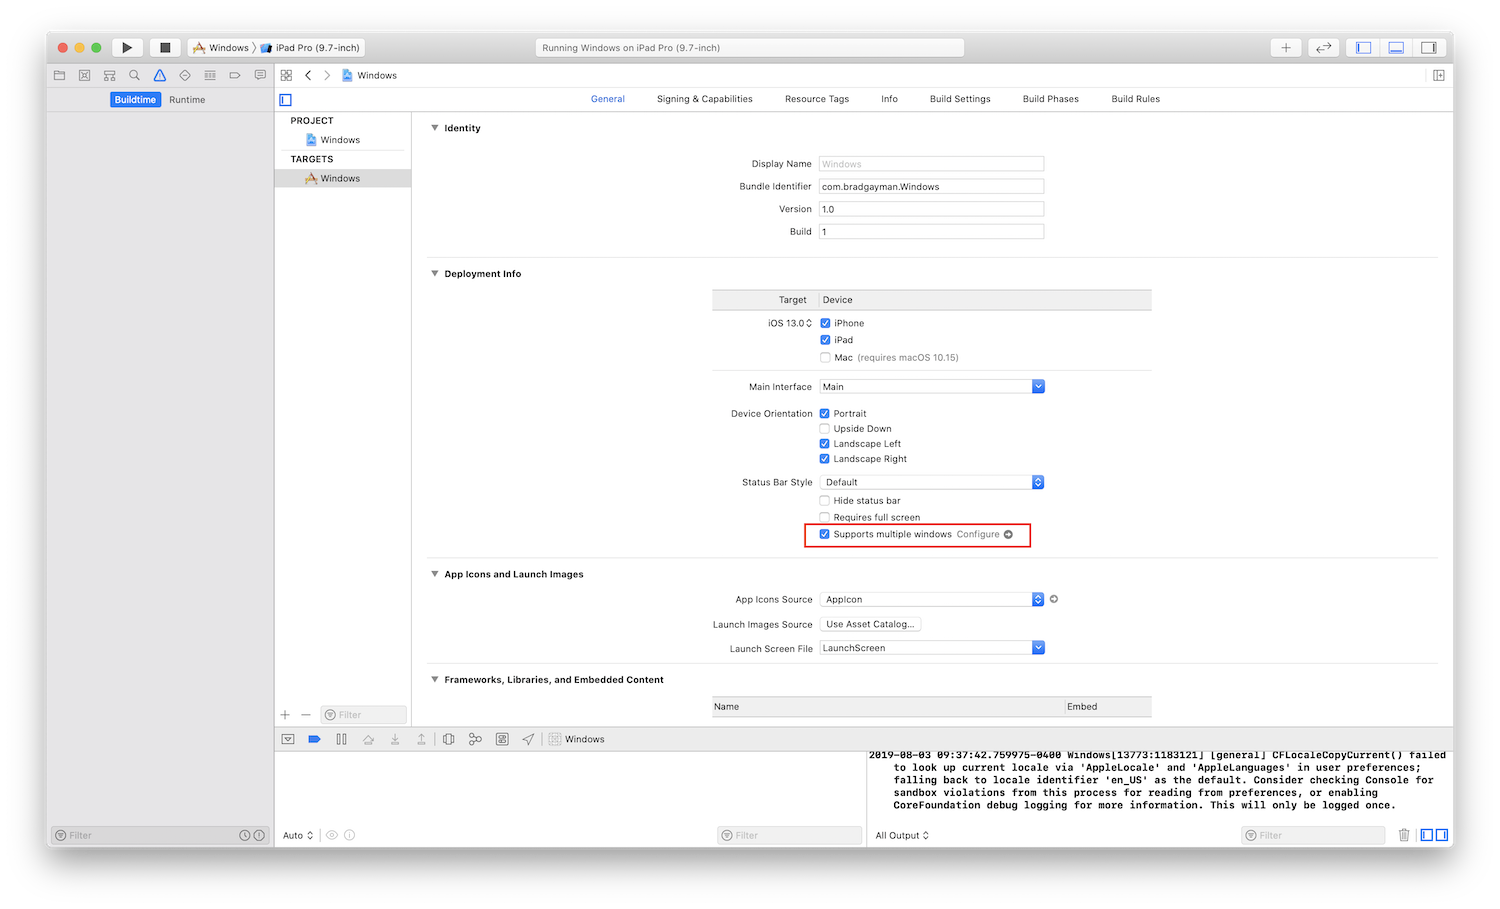
So let's get started. The first thing to do is go to the project settings. In the "General" tab, under the "Deployment Info" section, check the "Supports Multiple Windows" checkbox.
If you build and run now, you will see a black screen. That's because simply checking the multiple windows checkbox is not enough to enable multi-window support. To handle multiple windows on iPad, Apple introduced the idea of UIWindowScene and UISceneSession. I recommend watching the WWDC session Introducing Multiple Windows on iPad for the exact role these two classes play in enabling multi-window support on iPad. But, a high-level overview is these two classes manage the lifecycle of a specific window within an iPad app. The classes allow for multiple instantiations of application UI and also the purging of that UI if the system is constrained, all while maintaining application state.
By checking the "Supports Multiple Windows" checkbox, we've asked the system to use UIWindowScene and UISceneSession to manage placing our app's UI on screen, but we haven't instructed the system about how that UI should be created. This is because the former ways of doing this – either in code in the AppDelegate or setting the "Main Interface" in project settings – will be ignored on OSs that support multiple windows. To fix this, we can add:
    func application(_ application: UIApplication, configurationForConnecting connectingSceneSession: UISceneSession, options: UIScene.ConnectionOptions) -> UISceneConfiguration {
        ...
    }
to our AppDelegate if we want to do all of our UISceneSession routing in code. Or, we can click the "Configure" button next to the "Supports Multiple Windows" checkbox and add to our "Application Scene Manifest" in Info.plist. For simplicity, we'll configure our scenes in our app's Info.plist.
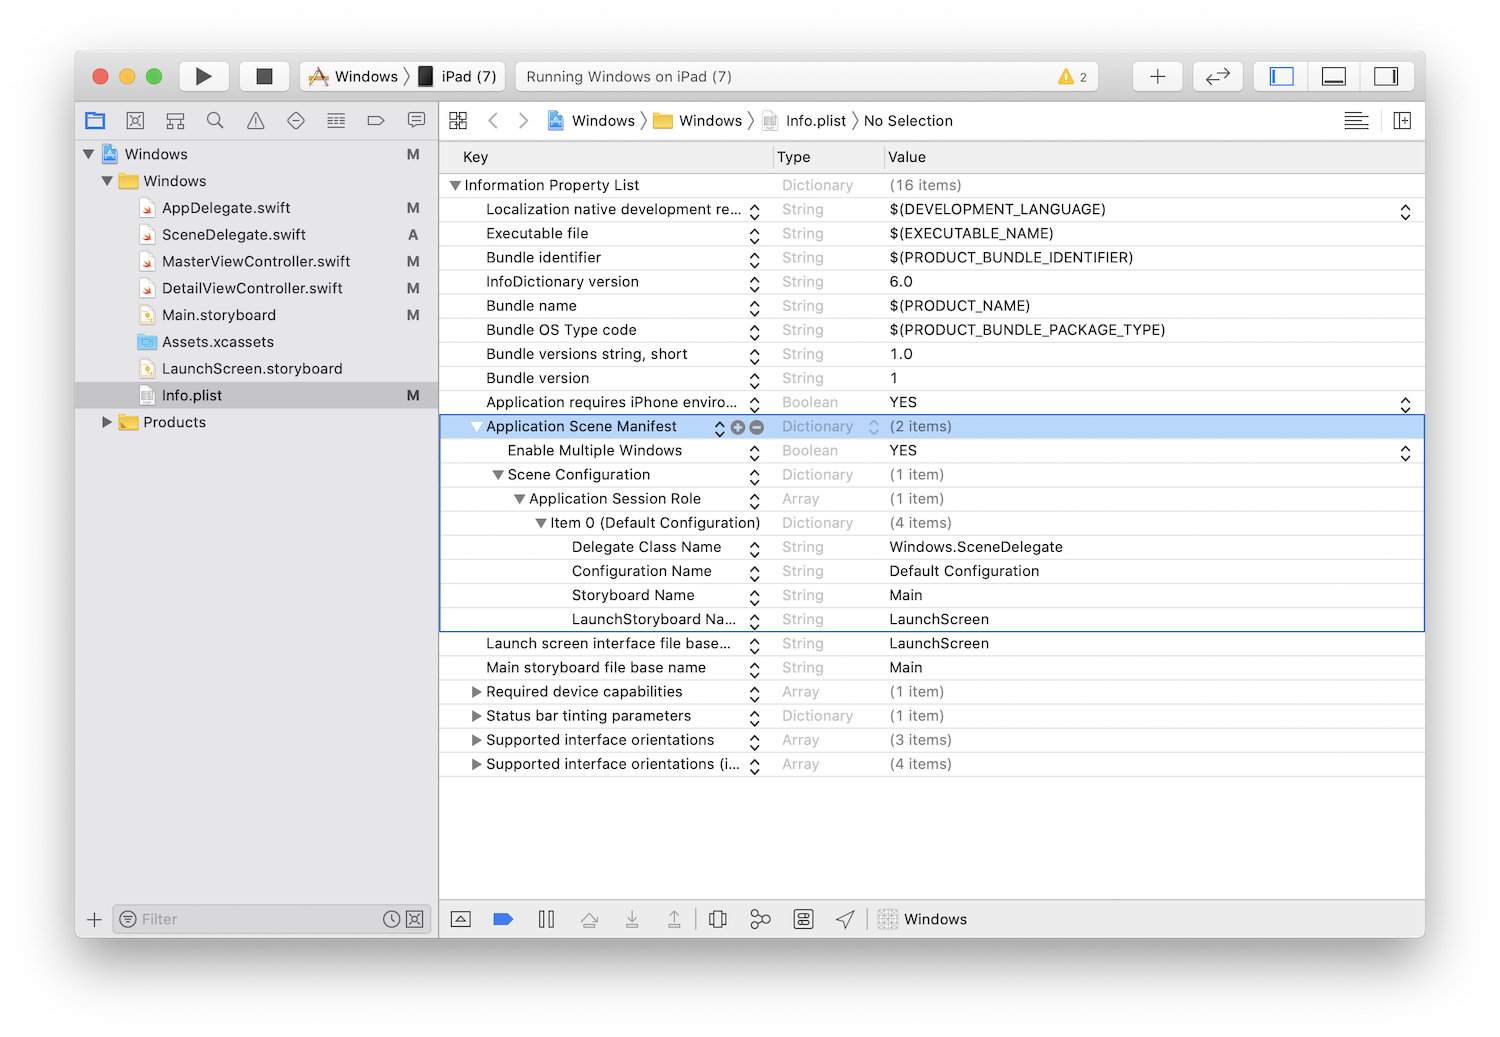
For the long and short of what each of these key-value pairs mean, you can read the documentation article Specifying the Scenes Your App Supports. But, the gist is we're specifying what window scenes our app supports and where the corresponding UI is for each of those scenes. The "LaunchStoryboard Name" and "Storyboard Name" of the configuration are pretty straight forward, they're just the interface files for the scene and the launch placeholder. "Configuration Name" is an internal name for the configuration. Finally, the "Delegate Class Name" is the name of the class that will act as the UIWindowSceneDelegate for this configuration. For us, it will be Windows.SceneDelegate – be sure to include the module namespace for your project.
Which leads to our next step, create a new swift file named "SceneDelegate." In it, we'll add our very basic conformance to UIWindowSceneDelegate.
    import UIKit

    final class SceneDelegate: NSObject, UIWindowSceneDelegate {
        var window: UIWindow?
    }
With all of that done, you should now be able to build and run. You should see the master-detail interface as before. To activate multiple windows of the app, swipe up from the bottom of the screen to reveal the dock. From the dock, tap and hold the app icon for our project, once the icon lifts up drag it to the top right corner, and 🎉, you now have your app running in two seperate windows at the same time. However, before we can deploy this to the App Store and call it a day. We might want to take a moment and play around with it.
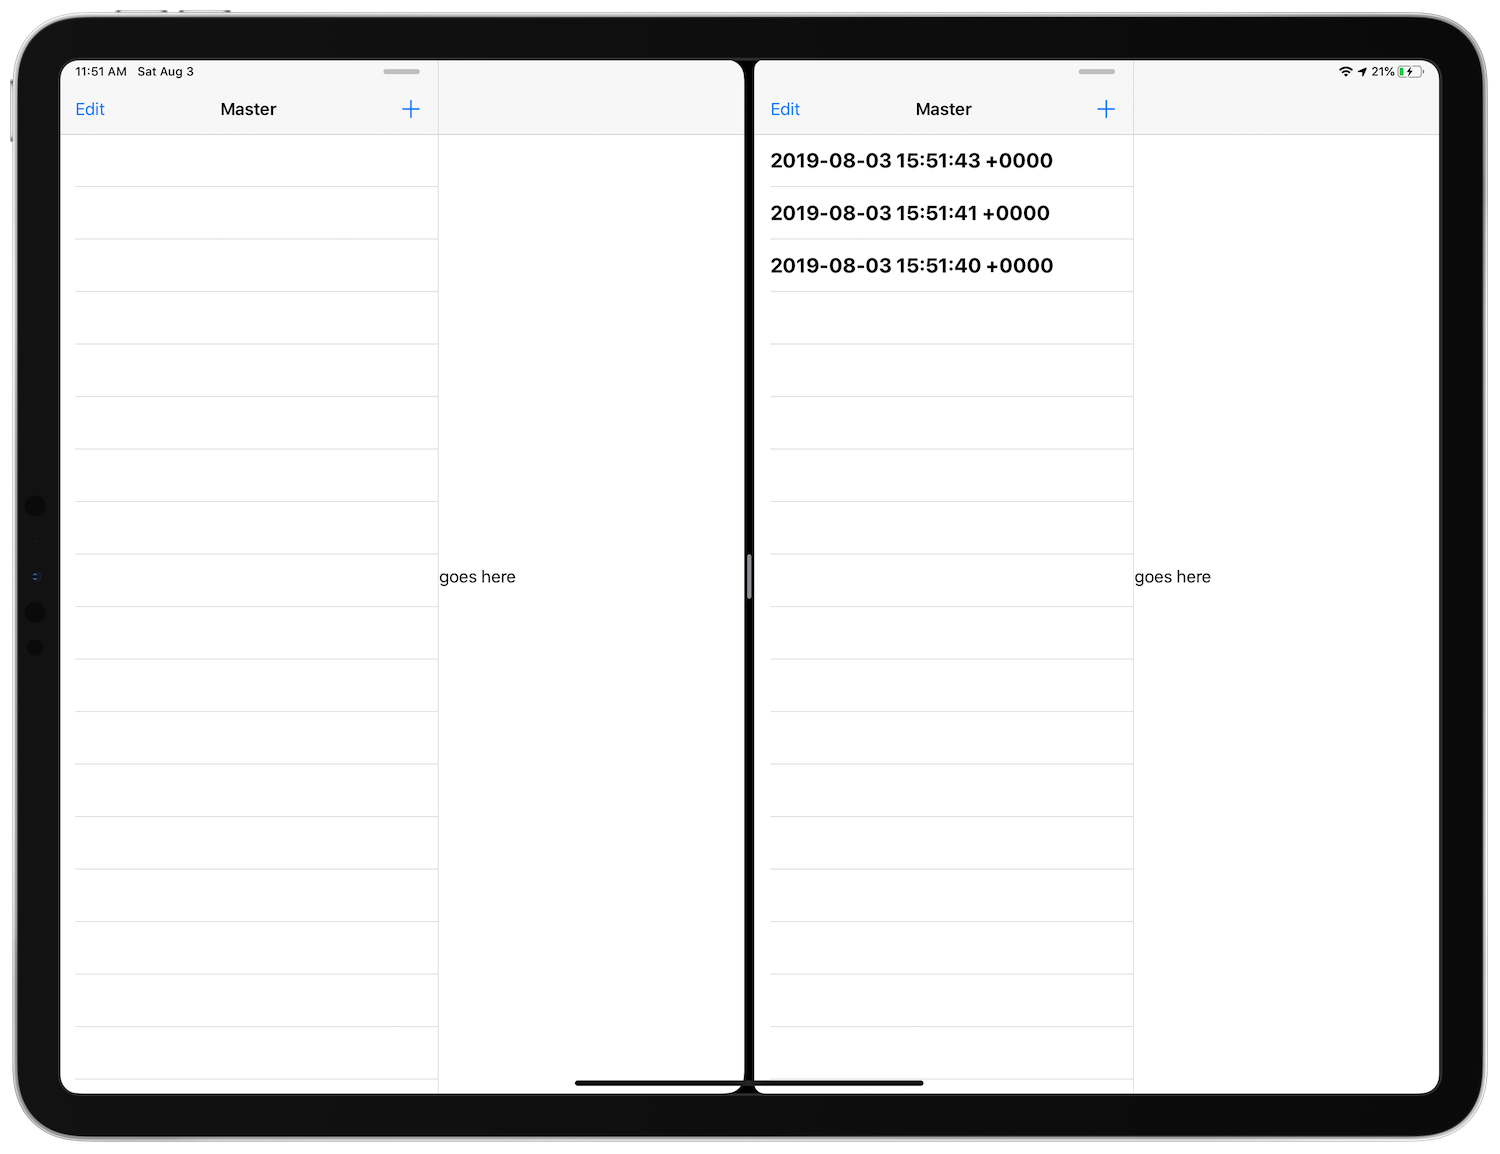
When I run the app in two windows and add timestamps to one instance, those timestamps do not appear in the other window. As a user, I would expect that adding timestamps into the app would cause them to appear in all of my windows. Because our timestamps are held in an array on MasterViewController, they are specific to that instance of MasterViewController. That was fine for our app when there was only ever one window. One window implied one MasterViewController, which meant only one array of dates. Now we have multiple windows, which means multiple instances of MasterViewController, but we still really only want one array of dates but displayed in all of the instances of MasterViewController.
To achieve this, Apple recommends having a data controller that is updated and then notifies other objects about underlying data changes. This should sound familiar if you've used Core Data, Realm, or other persistence frameworks where the general pattern is you write data changes to a store and then wait for a callback to update UI. We can do a similified version of the same thing. We'll create a DatesController which will hold an array of dates and notify any object that wants to be notified when that array is modified. While we do this, we'll lean on some of the changes announced for UI data sources, namely automatic diffing, so we don't lose the insert and delete animations found in the template.
With our plan in place, let's get started. The first thing we can do is add a new swift file named "DatesController." DatesController will be a small class to manage an array of dates and also call an array of closures whenever that array is modified. Also, because our app only needs one array of dates we'll create a singleton that will be shared by all of our instances of MasterViewController.
    import Foundation

    // Data controller that manages array of dates and informs observers when changes occur
    final class DatesController: NSObject {

        // Singleton instance
        static let shared = DatesController()

        // Array of dates
        var dates = [Date]() {
            didSet {
                // On modification call each of our observers
                onUpdates.forEach { onUpdate in
                    onUpdate()
                }
            }
        }

        // Private array that holds each of our observers
        private var onUpdates = [() -> Void]()

        // Function to add an onUpdate observer
        func addOnUpdate(_ onUpdate: @escaping () -> Void) {
            onUpdates.append(onUpdate)
        }
    }
Now that we have our DatesController, we can modify MasterViewController. First thing to do is delete var detailViewController: DetailViewController? = nil and var objects = [Any](). While the template shows how to access the detail view controller it's not really necessary, and, in my opinion, it's better encapsulation to not hold a reference to the detail view controller. To completely disentangle MasterViewController from DetailViewController go ahead an also delete the following from viewDidLoad:
    if let split = splitViewController {
        let controllers = split.viewControllers
        detailViewController = (controllers[controllers.count-1] as! UINavigationController).topViewController as? DetailViewController
    }
Also, we're replacing the objects array with DatesController.shared.dates, so it's no longer necessary. You're likely now getting some errors that say: Use of unresolved identifier 'objects'. That's okay, because we'll deal with each of these in turn.
Let's start but adjusting our data source. Because we want to preserve the animations that are found in the project template, we're going to use the brand new UITableViewDiffableDataSource. Thus, we no longer need to act as the data source for our table view. As such, we can delete all of the overrides that relate to section numbers, row number, and cell configuration. Please delete the following from MasterViewController.
    override func numberOfSections(in tableView: UITableView) -> Int {
        return 1
    }

    override func tableView(_ tableView: UITableView, numberOfRowsInSection section: Int) -> Int {
        return objects.count
    }

    override func tableView(_ tableView: UITableView, cellForRowAt indexPath: IndexPath) -> UITableViewCell {
        let cell = tableView.dequeueReusableCell(withIdentifier: "Cell", for: indexPath)

        let object = objects[indexPath.row] as! NSDate
        cell.textLabel!.text = object.description
        return cell
    }
Now we need to instantiate our data source and create a snapshot for our data source to render. For more information about how UITableViewDiffableDataSource works I recommend watching the Advances in UI Data Sources of WWDC 2019. Add the following code to the top of MasterViewController.
    // The sections for our table view we only have one so we can just call it main
    enum Section {
        case main
    }

    // The data source for a table view. With sections of object type Section and rows with object type Date
    lazy var dataSource = UITableViewDiffableDataSource(tableView: self.tableView) { (tableView, indexPath, date) -> UITableViewCell? in

        // Dequeue a cell
        let cell = tableView.dequeueReusableCell(withIdentifier: "Cell", for: indexPath)

        // Populate the text label with the date description
        cell.textLabel?.text = date.description

        // Return the cell
        return cell
    }

    lazy var currentSnapshot: NSDiffableDataSourceSnapshot =  {

        // Create a new snapshot
        let currentSnapshot = NSDiffableDataSourceSnapshot()

        // Add the only section to the snapshot
        currentSnapshot.appendSections([.main])

        // Add all of the dates from DatesController to that  section
        currentSnapshot.appendItems(DatesController.shared.dates, toSection: .main)

        // Return the snapshot
        return currentSnapshot
    }()
This creates a new data source for our table view and creates the initial snapshot of our data that can then me render in our table view. The next step is to modify our override of viewDidLoad. There we'll add ourselves as an observer of DatesController's array of dates, implement how we'll react to changes to the dates array, and set our newly instantiated data source as the dataSource of our table view.
    override func viewDidLoad() {
        super.viewDidLoad()
        // Do any additional setup after loading the view.

        // Add the edit button to the left bar button item
        navigationItem.leftBarButtonItem = editButtonItem

        // Init the add button and add to the right bar button item
        let addButton = UIBarButtonItem(barButtonSystemItem: .add, target: self, action: #selector(insertNewObject(_:)))
        navigationItem.rightBarButtonItem = addButton

        // Add MasterViewController as an observer to the DatesController dates array and perform the following whenever there's a change
        DatesController.shared.addOnUpdate { [weak self] in

            // Use weak self to prevent retain cycles and check if self is still around for this update
            guard let strongSelf = self else { return }

            // Create a new snapshot for the updated array
            strongSelf.currentSnapshot = NSDiffableDataSourceSnapshot<Section, Date>()

            // Still only have the one section
            strongSelf.currentSnapshot.appendSections([.main])

            // Add the updated array of dates to the snapshot
            strongSelf.currentSnapshot.appendItems(DatesController.shared.dates, toSection: .main)

            // Apply the new snapshot, animating the changes
            strongSelf.dataSource.apply(strongSelf.currentSnapshot, animatingDifferences: true)
        }

        // Use whatever animation the system deems best for changes
        dataSource.defaultRowAnimation = .automatic

        // Assign our UITableViewDiffableDataSource as the dataSource of our table view
        tableView.dataSource = dataSource
    }
Next, we'll update func insertNewObject(_ sender: Any). Whereas before, the template updated the objects array and then added a row to the table view, now we'll simply update the DatesController.shared.dates array and wait for the onUpdate callback. Change func insertNewObject(_ sender: Any) to:
    @objc
    func insertNewObject(_ sender: Any) {
        DatesController.shared.dates.insert(Date(), at: 0)
    }
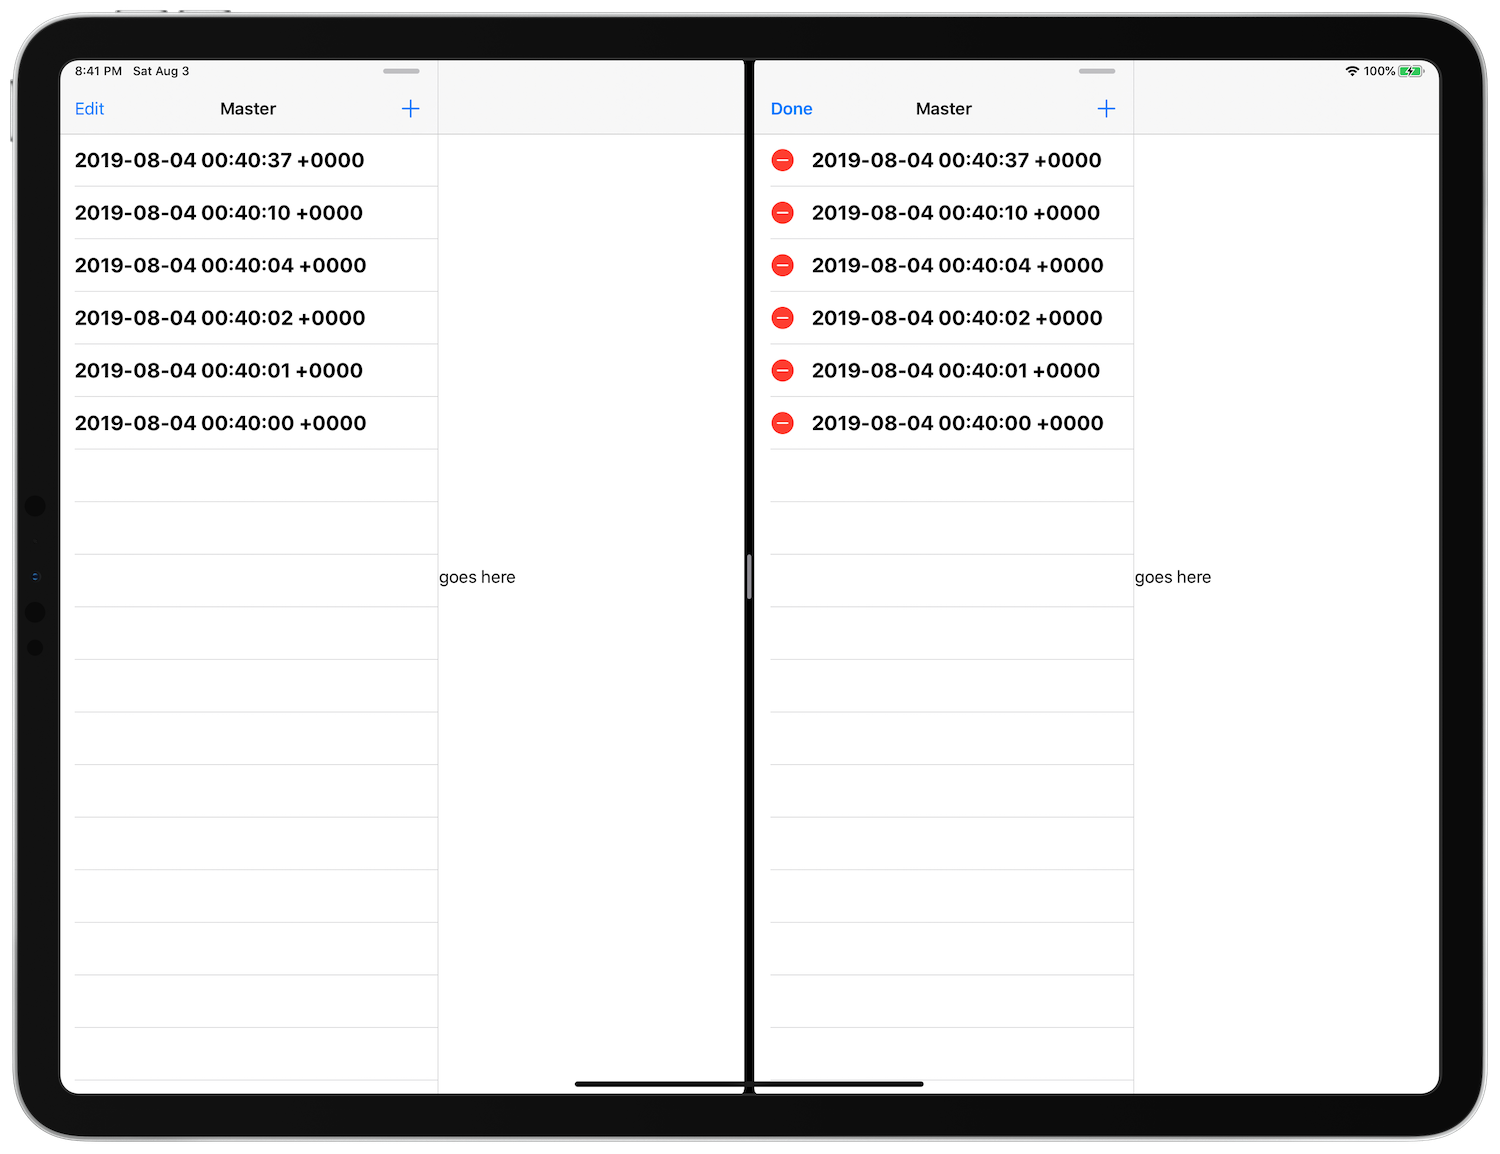
Lastly, we need to change the objects.remove(at: indexPath.row) in commitEditingStyle function to DatesController.shared.dates.remove(at: indexPath.row). And with that, you should now be able to build and run. When the app launches go ahead and put two windows of the app side-by-side and add a few dates to one of the windows master view controllers. After doing that, you may be thinking 🍾, we did it and feeling like:
But, if you put the table view in edit mode and try to delete a timestamp nothing happens. And as we want to recreate the template but with multiple window support, there's one last thing to fix.
Replace:
    override func tableView(_ tableView: UITableView, canEditRowAt indexPath: IndexPath) -> Bool {
        // Return false if you do not want the specified item to be editable.
        return true
    }

    override func tableView(_ tableView: UITableView, commit editingStyle: UITableViewCell.EditingStyle, forRowAt indexPath: IndexPath) {
        if editingStyle == .delete {
            objects.remove(at: indexPath.row)
            tableView.deleteRows(at: [indexPath], with: .fade)
        } else if editingStyle == .insert {
            // Create a new instance of the appropriate class, insert it into the array, and add a new row to the table view.
        }
    }
With:
    // The template uses a deprecated way of deleting replace with trailingSwipeActionsConfigurationForRowAt
    override func tableView(_ tableView: UITableView, trailingSwipeActionsConfigurationForRowAt indexPath: IndexPath) -> UISwipeActionsConfiguration? {

        // Create a delete action
        let deleteAction = UIContextualAction(style: .destructive, title: "Delete") { (_, _, completion) in
            DatesController.shared.dates.remove(at: indexPath.row)
        }

        // Return a configuration with the delete action
        return UISwipeActionsConfiguration(actions: [deleteAction])
    }
With that, you should have an app that allows you to insert and delete dates from the MasterViewController and displays those dates in all the open windows on the iPad.
You can find the complete source code on github. Feel free to send me feedback.