Multi-camera ARSession: Part II
JULY 23, 2019 github contact
AR World Tracking in an ARFaceTrackingConfiguration Session
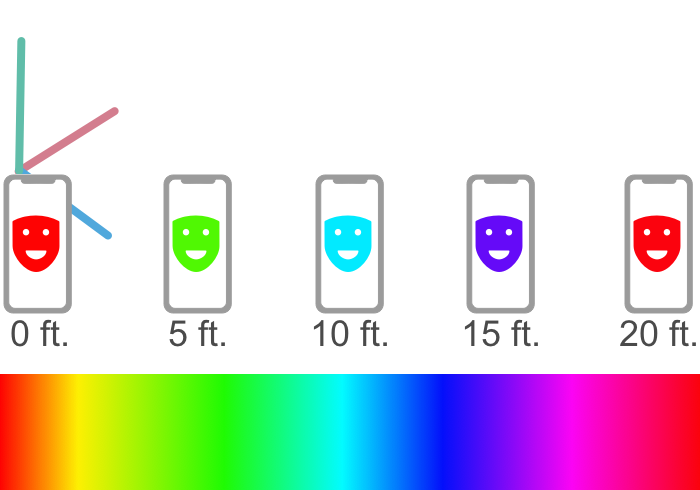
This is part two of our a look at multi-camera support for ARKit sessions. If you haven't already, I suggest you check out part one. Whereas in part one we looked at how to create an ARWorldTrackingConfiguration that also had face tracking, now we'll look at how to setup an ARFaceTrackingConfiguration that also has world tracking. That is, in part one we were showing the feed from the back camera and only using the front camera to monitor a face, now we're going to show the feed for the front camera but use the back camera to monitor the world around the device. In the process of learning how to set up our ARSession to support this, we'll create an app that changes the diffuse color of the facial mask provided by the ARFaceTrackingConfiguration as the distance between the camera's current location and the global origin of the ARSession changes.
As with part one, you'll need a copy of Xcode 11 and a device that is running iOS 13 with a TrueDepth™ camera and an A12 chip. As of this writing both Xcode 11 and iOS 13 are still and beta and can be downloaded at developer.apple.com. Now that that is done, we can get started.
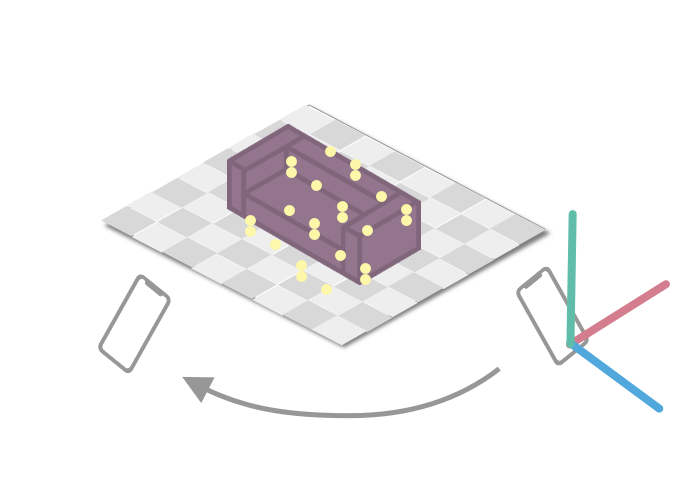
One thing you'll notice right away that is different from showing the back camera feed like in part one is that configuring the session of the secondary camera is somewhat limited. Whereas you'll use ARFaceTrackingConfiguration right out of the box, you typically configure ARWorldTrackingConfiguration further, almost always adding plane detection. However, because no ARWorldTrackingConfiguration object is exposed after turning on world tracking in an ARFaceTrackingConfiguration that is simply not possible. So, the amount of information you get about the world around the device might be lacking if you have elaborate plans. However, as briefly mentioned in this year's WWDC session, Introducing ARKit 3, you can get accurate device transformation data, which is exactly what we need for the app we'll build today.

ARSession begins.
Before we do that, I want to give a brief refresher about how ARKit works, as it will be partly relavent to the app we build. ARKit uses what known as visual-inertial odometry to create a model for the environment around the device. From Apple's developer documentation:
ARKit combines device motion tracking, camera scene capture, advanced scene processing, and display conveniences to simplify the task of building an AR experience.
Essentially, ARKit uses machine learning to track "visually interesting" points from the camera feed and track how they move over time. This data is then correlated with data from the gyroscope and compass of the device to model those points in 3D space. All of these points are placed in relation to a global origin. This global origin is the point (0, 0, 0) in the global space of the scene and is the location of the device when the ARSession begins. In the app we'll build, we'll look at the distance between the devices current location and this origin to update our face mask's material.
Start by opening Xcode and creating a new iOS project. Choose an augmented reality, SceneKit, app from the template picker.
Just like in part one, we're going to need geometry for our face mask. So we'll lazily instantiate a property, faceGeometry, to hold it in our ViewController class. We'll assign our faceGeometry a diffuse color using hue, saturation, and brightness. We do this because as the device moves around we'll change the hue giving the effect of moving through the continuous color spectrum. For this, we'll need a property that will determine essentially how long our color spectrum is.
    @IBOutlet var sceneView: ARSCNView!

    lazy var faceGeometry: ARSCNFaceGeometry = {
        let device = sceneView.device!
        let maskGeometry = ARSCNFaceGeometry(device: device)!
        maskGeometry.firstMaterial?.lightingModel = .physicallyBased

        // Using hue, saturation, and brightness because as the device moves we'll change the hue to give the continuous color spectrum
        maskGeometry.firstMaterial?.diffuse.contents = UIColor(hue: 0.0, saturation: 1.0, brightness: 1.0, alpha: 1.0)
        maskGeometry.firstMaterial?.roughness.contents = UIColor.black
        return maskGeometry
    }()

    // If the device moves twenty feet it will be at the end of the color spectrum.
    let maxFeet = Measurement(value: 20.0, unit: UnitLength.feet)
Essentially what we're trying to achieve can be seen in the following figure.

Next, in viewDidLoad, we'll do the typical setup, but we also need to set our ViewController as the session delegate. This will allow us to receive the func session(_ session: ARSession, didUpdate frame: ARFrame) callback.
    override func viewDidLoad() {
        super.viewDidLoad()

        // Set the view's delegate
        sceneView.delegate = self

        // Set session's delegate so we receive frame didUpdate callback
        sceneView.session.delegate = self

        // Create a new scene
        let scene = SCNScene()

        // Set the scene to the view
        sceneView.scene = scene

        // Light the scene
        sceneView.automaticallyUpdatesLighting = true
        sceneView.autoenablesDefaultLighting = true
    }
We have an ARSCNView with a scene, so now we need to setup and start our ARSession which will be done in viewWillAppear. Just like with part one, it's important to check if the configuration you want is supported on the user's device, for us that means checking if the ARFaceTrackingConfiguration supports world tracking. If it is, it is a simple matter of enabling world tracking.
    override func viewWillAppear(_ animated: Bool) {
        super.viewWillAppear(animated)

        guard ARFaceTrackingConfiguration.isSupported,
                ARFaceTrackingConfiguration.supportsWorldTracking else {
            // In reality you would want to fall back to another AR experience or present an error
            fatalError("I can't do face things with world things which is kind of the point")
        }

        // Create a session configuration
        let configuration = ARFaceTrackingConfiguration()

        // Enable back camera to do world tracking
        configuration.isWorldTrackingEnabled = true

        // Yasss estimate light for me
        configuration.isLightEstimationEnabled = true

        // Run the view's session
        sceneView.session.run(configuration)
    }
Our session is now running, let's quickly look at our implementation of ARSCNViewDelegate as it's largely taken straight from part one.
    // MARK: - ARSCNViewDelegate -
    func renderer(_ renderer: SCNSceneRenderer, nodeFor anchor: ARAnchor) -> SCNNode? {
        // Check if face anchor
        if let faceAnchor = anchor as? ARFaceAnchor {

            // Create empty node
            let node = SCNNode()

            // Update our `faceGeometry` based on the geometry of the anchor
            faceGeometry.update(from: faceAnchor.geometry)

            // Attach `faceGeometry to created node
            node.geometry = faceGeometry

            // Return node
            return node
        }

        // Don't know and don't care what kind of anchor this is so return empty node
        return SCNNode()
    }

    func renderer(_ renderer: SCNSceneRenderer, didUpdate node: SCNNode, for anchor: ARAnchor) {

        // If it's a face anchor with a node that has face geometry update the geometry otherwise do nothing
        if let faceAnchor = anchor as? ARFaceAnchor,
            let faceGeometry = node.geometry as? ARSCNFaceGeometry {
            faceGeometry.update(from: faceAnchor.geometry)
        } else {
            print(anchor)
        }
    }
Finally, let's fill in our implementation of ARSessionDelegate for this we're going to need two helper functions:
    // Length of a 3D vector
    func length(_ xDist: Float, _ yDist: Float, _ zDist: Float) -> CGFloat {
        return CGFloat(sqrt((xDist * xDist)+(yDist * yDist)+(zDist * zDist)))
    }

    // Distance between two vectors
    func distance(between v1:SCNVector3, and v2:SCNVector3) -> CGFloat {

        let xDist = v1.x - v2.x
        let yDist = v1.y - v2.y
        let zDist = v1.z - v2.z

        return length(xDist, yDist, zDist)
    }
Here, we're simply taking the difference between two vectors and using the generalized Pythagorean theorem to find the length of the result. Lastly, we'll make use of this by getting the translation of the camera from the origin, determine the distance travelled, converting that to a percentage of the maxFeet, and updating our faceGeometry's hue.
    func session(_ session: ARSession, didUpdate frame: ARFrame) {

        // Get translation of the camera
        let translation = frame.camera.transform.columns.3

        // Find distance between translation and origin
        let distance = self.distance(between: SCNVector3(translation[0], translation[1], translation[2]), and: SCNVector3(0, 0, 0))

        // Convert max feet to meter as in ARKit one unit is one meter not foot
        let maxMeters = maxFeet.converted(to: UnitLength.meters)

        // Normalize distance to our max
        let percentToMax = distance / CGFloat(maxMeters.value)

        // Clamp color so once you go past maxFeet in distance mask just stays red
        let hue = min(percentToMax, 1.0)

        // Update mask color
        faceGeometry.firstMaterial?.diffuse.contents = UIColor(hue: hue, saturation: 1.0, brightness: 1.0, alpha: 1.0)
        updateLabel(distance: Measurement(value: Double(distance), unit: UnitLength.meters))
    }
With that you should be able to build and run and get a face mask that changes color depending on the distance you travelled from the origin. Of course, you can also do it with different color spectrums, for example gray scale. Also, I could easily image a Simon Says style game where a user must travel in a certain direction from the origin with a face mask updating hotter and colder as they move.
In conclusion, world tracking with an ARFaceTrackingConfiguration, while limited by not allowing for plane detection, can still be used to create compelling user experiences. It's easy to enable and works as expected even in beta form.
You can find the compeleted project on github. Feel free to send me feedback.